CLASS; J S S 2 WEEK 7
TOPIC; PAPER MACHE.
: Paper Mach
Paper-Mach is the art of modelling with torn or shredded paper bound together with glue. Usually a water-based type. The techniques are quickly mastered and offer endless variation. Almost any object can be used as a mold for Paper-Mach, although round objects are easier to cover smoothly if the mold is to be removed later. Bowls and large dishes are excellent. Wire mesh shapes can be molded to produce any number of interesting shapes, and structures made from cardboard, known as armatures, can also be covered. You can use Paper-Mach pulp to make bowls or to build up sculpted images. Just push it into shape with your hands or a stiff paintbrush. Drying may take several days. To make your own paper pulp. Tear five sheets of newspaper in to 2.3 cm (1 in) squares and place in a saucepan. Cover with water and simmer for 30 minutes, Spoon the paper and water into a blender and process to a pulp. Transfer the pulp to a lidded plastic box and store until required (it will keep for several weeks). When ready to use, add 2½ tablespoons PVA (white) glue and 1 tablespoon each wallpaper paste. Plaster of Paris and linseed oil and stir vigorously.
Preparation methods
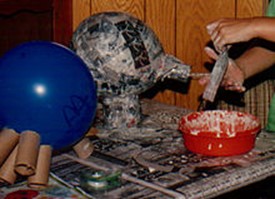
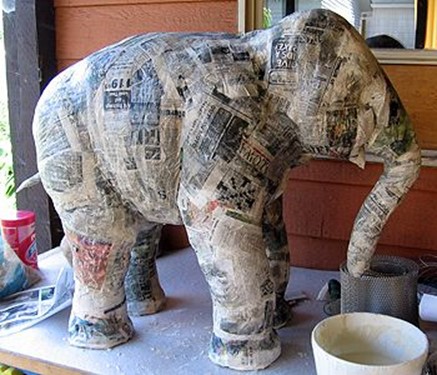
Papier-mâché with the strips method for the creation of a pig.

Papier-mâché mask created with the pulp method
Two main methods are used to prepare papier-mâché; one makes use of paper strips glued together with adhesive, and the other method uses paper pulp obtained by soaking or boiling paper to which glue is then added.
With the first method, a form for support is needed on which to glue the paper strips. With the second method, it is possible to shape the pulp directly inside the desired form. In both methods, reinforcements with wire, chicken wire, lightweight shapes, balloons or textiles may be needed.
The traditional method of making papier-mâché adhesive is to use a mixture of water and flour or other starch, mixed to the consistency of heavy cream. Other adhesives can be used if thinned to a similar texture, such as polyvinyl acetate-based glues (wood glue or, in the United States, white Elmer’s glue). Adding oil of cloves or other additives such as salt to the mixture reduces the chances of the product developing mold.
For the paper strips method, the paper is cut or torn into strips, and soaked in the paste until saturated. The saturated pieces are then placed onto the surface and allowed to dry slowly. The strips may be placed on an armature, or skeleton, often of wire mesh over a structural frame, or they can be placed on an object to create a cast. Oil or grease can be used as a release agent if needed. Once dried, the resulting material can be cut, sanded and/or painted, and waterproofed by painting with a suitable water-repelling paint.
Before painting any product of papier-mâché, the glue must be fully dried, otherwise mold will form and the product will rot from the inside out.
For the pulp method, the paper is left in water at least overnight to soak, or boiled in abundant water until the paper dissolves in a pulp. The excess water is drained, an adhesive is added and the papier-mâché applied to a form or, especially for smaller or simpler objects, sculpted to shape.
Paper boats
One common item made in the 19th century in America was the paper canoe, most famously made by Waters & Sons of Troy, New York. The invention of the continuous sheet paper machine allows paper sheets to be made of any length, and this made an ideal material for building a seamless boat hull. The paper of the time was significantly stretchier than modern paper, especially when damp, and this was used to good effect in the manufacture of paper boats. A layer of thick, dampened paper was placed over a hull mold and tacked down at the edges. A layer of glue was added, allowed to dry, and sanded down. Additional layers of paper and glue could be added to achieve the desired thickness, and cloth could be added as well to provide additional strength and stiffness. The final product was trimmed, reinforced with wooden strips at the keel andgunwales to provide stiffness, and waterproofed. Paper racing shells were highly competitive during the late 19th century. Few examples of paper boats survived. One of the best known paper boats was the canoe, the “Maria Theresa,” used by Nathaniel Holmes Bishop to travel from New York to Florida in 1874–75. An account of his travels was published in the book “Voyage of the Paper Canoe.”
Paper masks
Creating papier-mâché masks is common among elementary school children and craft lovers. Either one’s own face or a balloon can be used as a mold. This is common during Halloween time as a facial mask complements the costume.
TEARING NEWSPAPER
- Tearing rather than cutting newspaper creates less obvious joins between strips. Newspaper has a grain and will tear much more easily in one direction than the other. Generally, the grain runs from the top to the bottom of the newspaper. If you try to tear against the grain, it becomes impossible to control.
- To make paper strips, grasp several folded sheets of newspaper in one hand. Begin to tear about 2.5 cm (1 in) from the edge, along the grain. Pull directly down, and the paper will tear into long, straight strips. Strips of almost any width can be produced this way.
PREPARING A MOLD
- Before applying Paper-Mach to a mold, the surface must be lightly greased with petroleum jelly to create a barrier between the glue and the mold, preventing the Paper-Mach from sticking to it. It will then be easy to remove the Paper-Mach when it has dried. Cling film (plastic wrap) can sometimes be used Instead.
LAYERING
- Cover large molds with five to six layers of paper strips, 2.5 cm (1 in) wide. Spread the strips with PVA (white) glue on both sides and lay them individually in the greased mold from top to bottom, The strips should protrude slightly beyond the mold. Lay the second and third layers at right angles to the first. Smooth each strip with your fingers and press out any air bubbles.
REMOVING FROM A MOLD AND FINISHING
- When the surface of the paper in the mold is dry, gently pull back the edge and, if it seems almost dry underneath, insert a blunt knife and gently pries (pry) the paper away from the mold. Leave the Paper-Mach upside down to dry completely.
- Trim the raw edge from the paper shape using scissors. Following the indent of the edge of the mold to ensure an accurate curve. To prevent the layers of paper from coming apart, bind the edges of the shape using thin strips of newspaper.
DRYING FLAT OBJECTS
- Paper-Mach objects such as picture frames and wall panels should be dried flat after sealing to prevent warping. Place the object on a wire cake rack or a sheet of thin plastic the glue will stick to the plastic as It dries, but the plastic can easily be peeled away once the Paper-Mach is dry.