CLASS; J S S 3 WEEK 5
TOPIC; BATIK
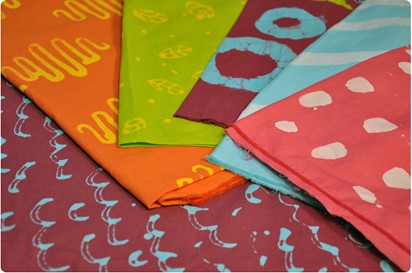
Batik is a technique of handdyeing fabrics by using wax as a dye repellent tocover parts of a design, dyeing the uncovered fabric with a color orcolors, and dissolving the wax in boiling water. A process of printing fabric in which parts not to be dyed are covered by wax.
About Batik
Batik is a “resist” process for making designs on fabric. The artist uses wax to prevent dye from penetrating the cloth, leaving “blank” areas in the dyed fabric. The process, wax resist then dye, can be repeated over and over to create complex multicolored designs.
Batik is especially unique due to the way certain wax blends will “crackle” during handling, allowing lines of color to come through on resisted areas.
Batik can be done with many types of dye & wax on cotton, silk and other natural fabrics. Most weights will work, provided the wax penetrates all the way through the fabric, but the finer weaves work best for detail work. We used cotton, but feel free to use what you want. Silk is a little more challenging to work with because of its unique wicking properties.
Batik masters employ a process of repeated waxing and tub dyeing to achieve their final result. This method requires mastery of color mixing and over dyeing; as each layer of dye is applied over the last a new color is produced. You don’t have to be a batik master, however, to get some great fun results.
This method uses repeated layers of wax and dye applied to the fabric, yielding an overlapping color design. If you plan to do multiple layers you will want to dye your colors from lightest to darkest.
Step 1: Pre-wash your fabric to remove any impurities that might interfere with dyeing. We recommend using Synthrapol for this.
Step 2: Pre-dye a few of your fabrics in some different base colors.
Step 3: Start melting your premixed Batik Wax in the little melting pot, or for bigger projects, in a double boiler, electric wax pot, or old electric frying pan set at about 220-230°F .
Step 4: Stretch the fabric on a Frame or Hoop, that will keep the fabric flat and horizontal or you can work on some newsprint paper or a piece of cardboard if you don’t have a frame. This is often easier with larger pieces of fabric.
Step 5: Start applying your wax with tools of your choice.
Remember: When applying wax, no matter what method you are using, regulate the temperature so that it penetrates the fabric; not so cool that it just turns yellowish and sits on top, and not so hot that all your lines spread out too much. The wax should have a clear appearance, indicating it has penetrated to the other side. Flip fabric over and apply wax anywhere it has not. Thin layers of very hot wax will often allow some dye to stain the fabric under the wax, whereas a thicker buildup will keep the wax off.
Step 6: Tub Dye the fabric, first using the lightest or brightest color that will be on the piece and will mix well with successive colors, for example yellow; then the next dye bath could be turquoise, which would actually mix with the yellow to dye the fabric green in all the un-waxed areas. Remember, after Soda Ash has been added to the dyebath, don’t leave your waxed fabric in for more than 30 minutes more, as soda ash eats away the wax eventually, exposing areas to unwanted dye.
Step 7: Rinse and gently hand wash the fabric in Synthrapol and allow to dry. Use lukewarm water so as not to melt your wax!
Step 8: Repeat steps 2-6 above for each color you plan for your batik, waxing areas after each dye bath that you want to remain that most recent color, and re-waxing any areas that look eroded from the Soda Ash. Tub dye your darkest areas last.
Step 9: Remove the Wax using one of these methods:
Boil the wax out. Choose a pot to become your official wax pot that will comfortably hold your fabric and fill with water and a dash of Synthrapol, or other liquid detergent, to get the wax and any excess dye away from the fabric. Bring this to a simmer and add fabric. Stir the fabric around in the boiling water keeping it submerged. After a few minutes the wax will melt out of the fabric and float to the top. When the wax seems completely removed from the fabric, remove from heat and allow the water to cool. Be sure that the fabric sits on the bottom of the pan, avoiding the floating wax residue. You can weigh it down with rocks or something heavy. Allow to cool, then peel the hardened wax off the surface and remove the fabric.
Pro-Tip:You can reuse this wax for your next project as long as the water has dried out of it.
Iron the wax out. Sandwich your fabric between layers of absorbent paper and iron, to melt the wax out. This process often leaves a wax residue that looks like a grease spot and won’t come out, so it is not our favorite.
Step 10: Wash your fabric one last time in the washing machine with Synthrapol to remove any left over dye you couldn’t get out by hand. Dry your fabric.